How to Make Wax Melts – A Cozy DIY for Your Home
There’s something so comforting about a house that smells like warm vanilla, soft lavender, or even a little pumpkin spice on a crisp fall morning. Wax melts have become one of my favorite ways to fill our home with delightful scents—without the need for an open flame, which feels so much safer with little ones running around. The best part? You don’t have to buy them from a store. Once you learn how to make wax melts, you’ll never go back. It’s surprisingly easy, budget-friendly, and full of creative possibilities for making your home smell exactly how you want it to.

So whether you’re wanting to reuse leftover wax, make something with natural ingredients, or create a custom fragrance that fits your mood or the season, this blog will walk you through a simple recipe for homemade wax melts—step by step.
Why Make Your Own Wax Melts?
Store-bought wax melts often contain paraffin wax, synthetic colors, and artificial fragrance oils that can become a fire hazard, especially if overheated. Making your own wax melts lets you choose natural soy wax, your favorite essential oil blend, or even a personal favorite fragrance oil that reminds you of a Christmas tree, cookies, or clean linen.
They’re also a safer alternative to candles if you have young children at home, since they’re used in a wax warmer or electric wax melt warmer—no flames, no fuss.
How to Make Wax Melts – Simple DIY Recipe

You’ll Need:
Instructions:
1. Melt your wax:
In a double boiler over medium heat, melt your soy wax and coconut oil together. Stir gently until completely liquified. Avoid using high heat as it can burn the wax.

2. Add fragrance:
Once melted, remove from heat and let cool slightly (ideal temp is around 160–175°F for the best fragrance throw). Stir in your fragrance oil or essential oil blend—add more if you like a strong oil scent.

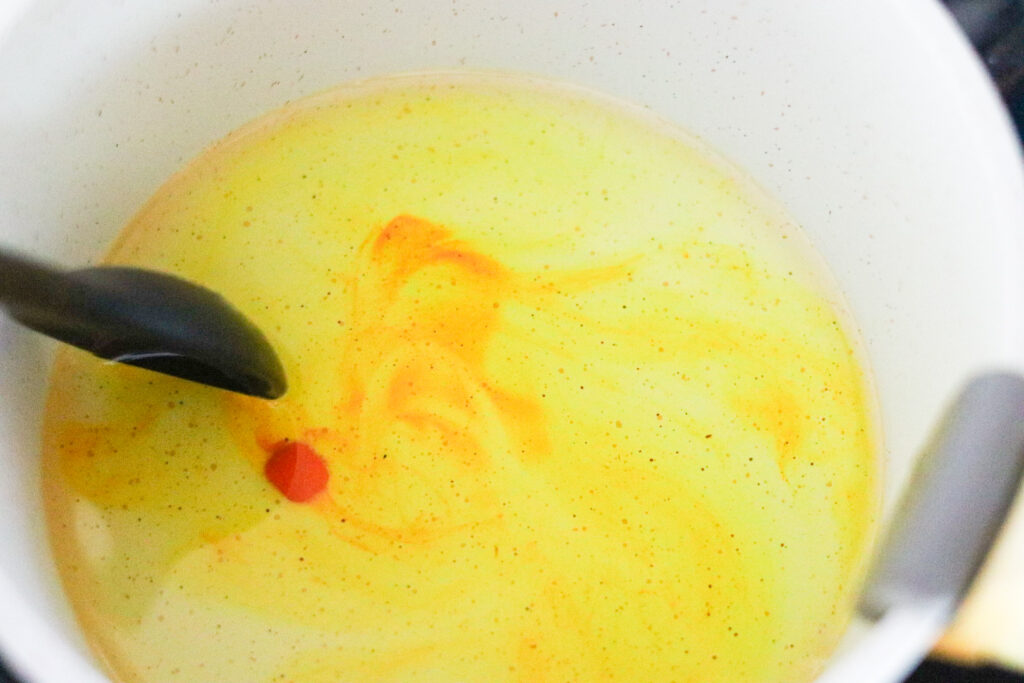
3. Color (optional):
If you’re using candle dye, add just a tiny bit until you reach your desired shade. Stir well to avoid air bubbles.
4. Pour into molds:
Carefully pour your hot wax into your silicone mold or different molds. Let sit undisturbed until fully hardened—about 1–2 hours.

5. for best results:
For a strong enough scent, let your wax melts sit in an airtight container for 7–10 days before using. This allows the oils to fully bond with the wax for better scent throw.

Favorite Scent Combos for Your Wax Melts
If you’re not sure where to start with blending, here are some of my personal favorite fragrance combos. These work beautifully in wax melts and make your whole home feel warm, clean, or just plain cozy:
- Lavender + Vanilla – calming and cozy, perfect for winding down at night
- Pumpkin Spice + Cinnamon + Clove – warm and spicy, like a fresh-baked fall treat
- Eucalyptus + Peppermint – clean and refreshing, great for clearing the air or boosting energy
- Lemon + Rosemary + Lavender – bright and herbal, perfect for morning melts or spring days
- Orange + Clove + Cinnamon – festive and inviting, like simmering cider during the holidays
Feel free to mix and match based on your mood or the season—it’s all about creating a scent that feels like home to you.
Shop This Post
(These are affiliate links—I only share what I’ve used and loved in my own home!)
- Natural Soy Wax – I love this because it’s clean-burning and gives a smooth melt with great fragrance hold.
- Coconut Oil – I add this to help my wax melt at a lower temperature and last a little longer.
- Fragrance Oils – These give off a cozy, strong oil scent without overpowering.
- Essential Oils – I use these when I want a more natural blend like drops of lavender or eucalyptus.
- Silicone Mold – This one has the prettiest different shapes and pops wax melts out easily.
- Wax Warmer – I love mine for filling a room in minutes without the worry of an open flame.
Ways to Customize Your Wax Melts
Once you’ve got the basic melt recipe down, try experimenting with:
- Different types of wax: Like beeswax or a soy/paraffin blend (though natural soy wax is still my favorite).
- Creative fragrance combos: Think pumpkin spice, lavender essential oil, peppermint mocha, or custom fragrance blends for each season.
- Fun molds: Try hearts, stars, or seasonal different shapes—a great way to make gifts or cute stash items for your own home.
- Color: Add a touch of wax dye for a little personality—just go easy to avoid staining your wax burner.

How to Use Wax Melts
Break off one or two wax cubes and place in your wax warmer or electric wax melt warmer. No tea lights or flames needed! Let the melted wax release scent for hours—then turn it off and let it cool. You can remelt that same cube a few more times before the fragrance fades.
To clean, pop the old wax melts out once cooled or use a paper towel to soak up any hot wax while it’s still warm. Then wash with dish soap and rinse well.
Blogs You’ll Love
Looking for more cozy, natural DIYs to fill your home with warmth and peace? These go hand-in-hand with your wax melt journey:
- DIY Eucalyptus Candle – Simple Aromatherapy Recipe
Make your own calming candle using natural essential oils and simple ingredients. - Toilet Bowl Air Freshener – Natural At-Home Recipe
Keep every space smelling fresh with this flameless, chemical-free scent solution. - Peaceful Sleep Spray – Bedtime Essential Oil Mist
A cozy nighttime blend that pairs beautifully with lavender wax melts. - Homemade Carpet Cleaner – Natural and Effective DIY
For keeping the rest of your home feeling as fresh as your wax melts smell.

FAQ – How to Make Wax Melts
What’s the best type of wax to use for wax melts?
I love using natural soy wax because it’s clean, easy to work with, and gives great scent throw. You can also try blends with coconut oil or beeswax depending on your preferences.
Can I use essential oils instead of fragrance oils?
Yes, but they tend to be lighter in scent. If you’re using natural essential oils, be sure to add enough (20–30 drops) and let the melts cure for 1-2 weeks for best results.
How do I store homemade wax melts?
Keep them in an airtight container, away from direct sunlight or heat. This helps preserve the scent and texture for a long time.
How long do wax melts last?
One cube can scent a space for several hours and can be remelted multiple times. A full batch can last you weeks depending on how often you melt.
Is there a way to make wax melts in a slow cooker?
Yes! If you don’t want to use a double boiler, a slow cooker on low can be used to melt your candle wax safely—just line it with a jar or mason jar for easy cleanup.
How to Make Wax Melts – A Cozy DIY for Your Home

So whether you’re wanting to reuse leftover wax, make something with natural ingredients, or create a custom fragrance that fits your mood or the season, this blog will walk you through a simple recipe for homemade wax melts—step by step.
Ingredients
- 1 cup natural soy wax (or your particular wax of choice)
- 1 tablespoon coconut oil (helps with scent throw and a lower melting point)
- 20–30 drops of essential oil blend or 1–2 teaspoons fragrance oil (I've listed some of myfavorite scents below)
- Optional: candle dye or wax dye for color
- Silicone mold or wax molds
- Double boiler (or a DIY setup using a glass bowl over a sauce pan)
- Paper towel, mason jars, and a clean glass cup for mixing
- A thermometer (optional, but helps with correct temperature)
Instructions
- Melt your wax: In a double boiler over medium heat, melt your soy wax and coconut oil together. Stir gently until completely liquified. Avoid using high heat as it can burn the wax.
- Add fragrance: Once melted, remove from heat and let cool slightly (ideal temp is around 160–175°F for the best fragrance throw). Stir in your fragrance oil or essential oil blend—add more if you like a strong oil scent.
- Color (optional): If you’re using candle dye, add just a tiny bit until you reach your desired shade. Stir well to avoid air bubbles.
- Pour into molds: Carefully pour your hot wax into your silicone mold or different molds. Let sit undisturbed until fully hardened—about 1–2 hours.
- Cure for best results: For a strong enough scent, let your wax melts sit in an airtight container for 7–10 days before using. This allows the oils to fully bond with the wax for better scent throw.
Notes
If you're not sure where to start with blending, here are some of my personal favorite fragrance combos. These work beautifully in wax melts and make your whole home feel warm, clean, or just plain cozy:
- Lavender + Vanilla – calming and cozy, perfect for winding down at night
- Pumpkin Spice + Cinnamon + Clove – warm and spicy, like a fresh-baked fall treat
- Eucalyptus + Peppermint – clean and refreshing, great for clearing the air or boosting energy
- Lemon + Rosemary + Lavender – bright and herbal, perfect for morning melts or spring days
- Orange + Clove + Cinnamon – festive and inviting, like simmering cider during the holidays
Final Thoughts
Wax melts are such a simple joy to make—and once you start crafting your own, you’ll never look at those store-bought packs the same again. Whether you’re blending up a new wax melt with drops of lavender, or pouring them into fun molds for a friend, it’s a beautiful, affordable way to add scent and comfort to your everyday space.
Now that you know how to make wax melts, I hope this becomes one of those cozy little crafts you come back to again and again. Let the wax melt, breathe in, and enjoy the work of your own hands.


